
…and my idea for an art piece to celebrate it.
The Hubble Space Telescope took the first photo of the “Pillars of Creation” (a section of interstellar gas and dust in the Eagle Nebula, in the Serpens constellation about 7,000 light-years away from Earth) in 1995.
At the time I was working at NASA’s Jet Propulsion Laboratory, and completely blown away by the photograph. The pillars are a place where stars are being born in “towering tendrils of cosmic dust and gas” (as NASA describes it).

Hubble revisited the nebula in 2014 with its new Wide Field Camera 3, and the more detailed photo that time was even more beautiful. It’s mind-blowing just contemplating how big this thing is: the pillars are 4–5 light-years tall — yet are “a fascinating but relatively small feature of the entire Eagle Nebula,” NASA says, “which spans 70 by 55 light-years.”
A light-year is 5.88 trillion miles (9.46 trillion km). The scale is almost inconceivable to the human mind.
Thanks to the Internet I was able to get a “full” resolution image from Hubble (6780×7071 pixels, almost 46 MB), but I put “full” in quotes because the only thing I could get was a .jpg, which is a compressed format. I suppose what I have isn’t compressed much, and it would print beautifully regardless, but….
It Gets Even Better

NASA launched the James Webb Space Telescope on Christmas 2021, and was finally in place and fully commissioned on July 12, 2022. Webb has a 6.5 m (21 ft)-diameter gold-coated beryllium primary mirror made up of 18 separate hexagonal mirrors — they’re so distinctive with their rose-gold hue and iconic shape that, well, that’s the primary feature of the telescope as you look at it. It’s beautiful in itself.
Webb is designed to image in infrared, which allows for even farther looks into our universe in incredible detail. And one of its early targets to image was (you guessed it) the Pillars of Creation, which was obtained on August 14, 2022. It’s the most beautiful and awe-inspiring space image I’ve ever seen:

Isn’t it amazing?! The full resolution of that, which is a combination of images from Webb’s NIRCam (Near Infra-Red Camera) and MIRI (mid to long infrared) instrument, is 7130×6675 pixels and about 60 MB as a .png — a lossless format. You can blow that up to a 50-inch (or even larger) print without losing detail. Perfect!
Then I researched to find a company that could print it for me in super-high resolution on metal with a high gloss for what I had in mind. I found a good vendor with great reviews and at a surprisingly good price (with free shipping!) They’re in Canada, and ship some formats worldwide (though free shipping seems to apply only in North America).
It was printed at “only” 23×24 inches, and here is the result (resting on a chair):
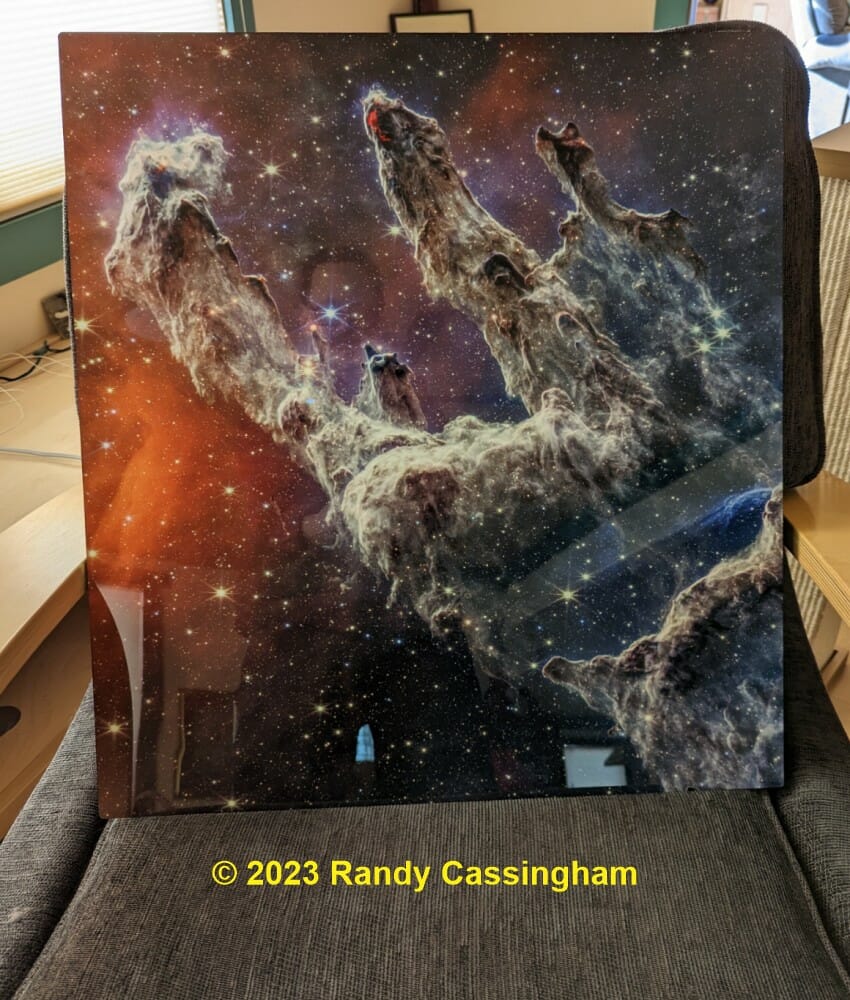
I decided to rotate the image by 90 degrees. After all, there’s no “up” in space — there’s nothing “incorrect” about changing the perspective, especially to make the Pillars more vertical, as in the original Hubble image. Plus it helps with my idea.
What I Had in Mind
“Just” a print of that, as amazing as it is, wasn’t enough. Something occurred to me to make it even more special: a nod to its photographer, the Webb Telescope and the thousands of people who worked for years to make it happen.
My idea was to put a physical representation of Webb’s mirror on the print itself. On a whim I looked on Amazon: do they just happen to sell small hexagonal mirrors finished in rose gold that I could build into a Webb mirror? You know, maybe around 1-1/2 to 2 inches each?
Incredibly, yes! And only 38 cents each (in a box of 50). You bet I’ll take that: less than $20 for the whole box! Enough to make two prints like this even if a few are chipped or scratched: there are plenty of extras, even if you make two of them!
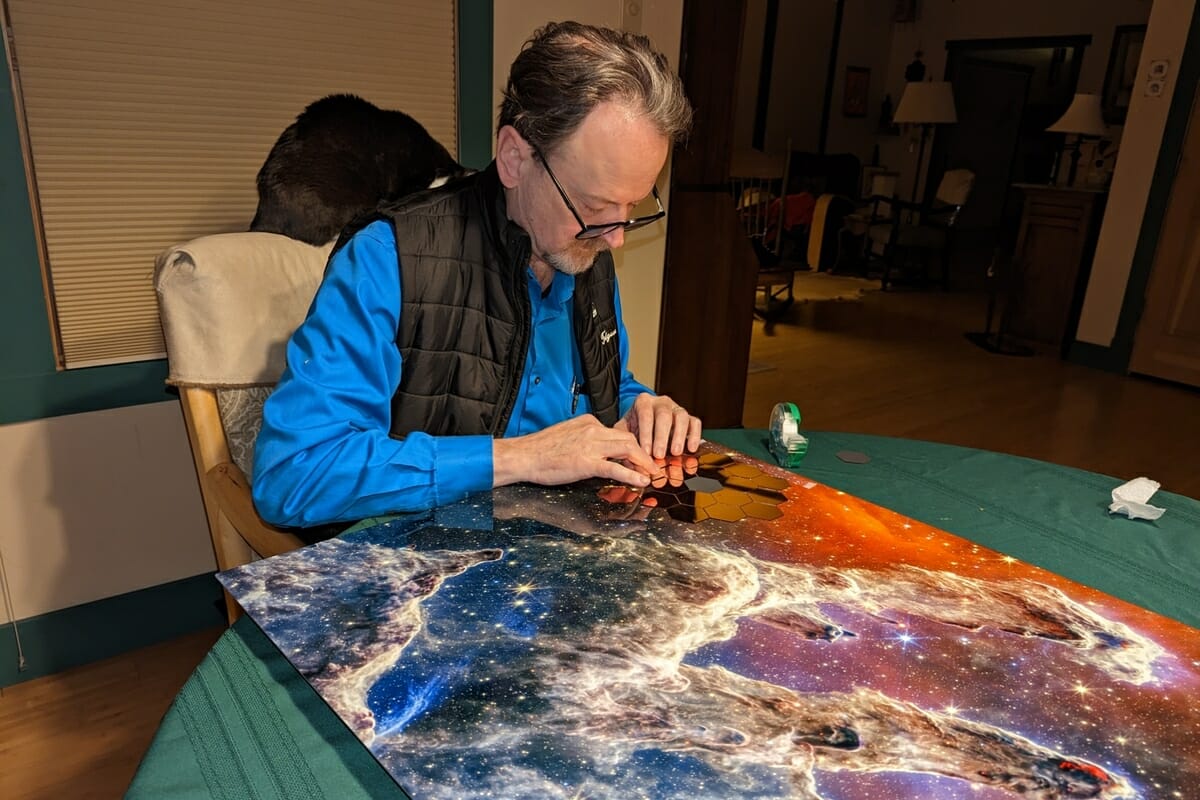
And here’s the result after laying the print on the dining room table and carefully gluing them down in the right pattern with a small blob of clear silicone seal on the back of each one:
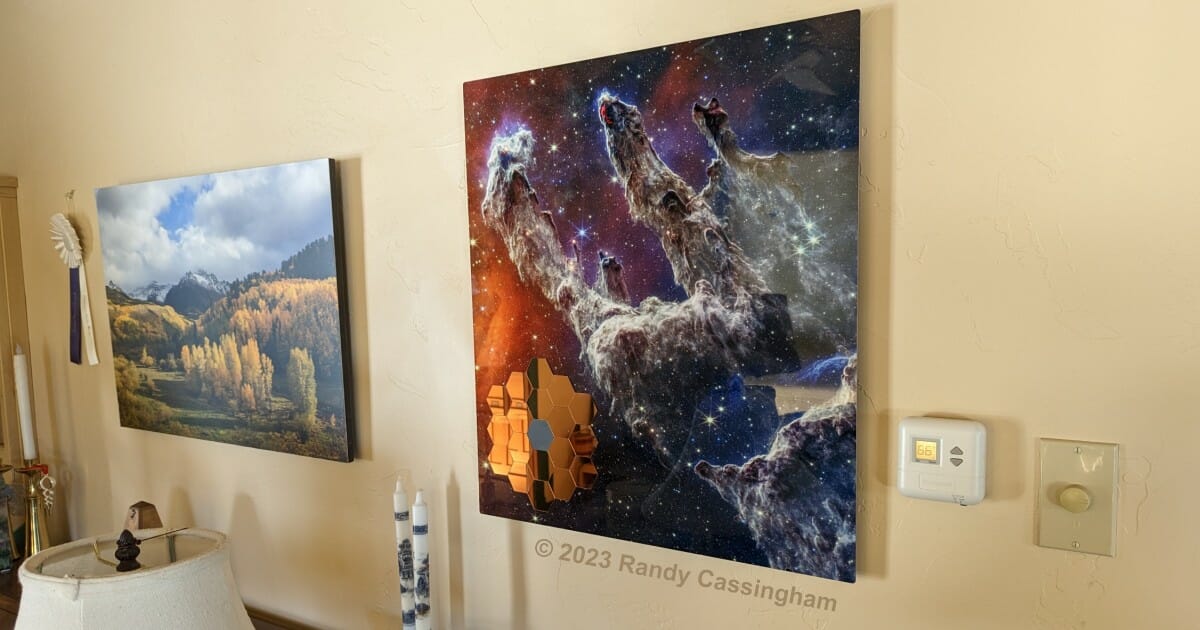
What about the matte black patch in the middle, where the instruments are? Easy: the mirrors happen to have matte black backs. Just turn one mirror over.
Parts Needed
You can find the full resolution image file and crop it as you want and find a printer, or you can buy it from the same printer I used from my professional “gallery” there. (Some of my landscape photography is also available in the gallery, such as the print you see above on the wall next to the Pillars.)
I’ve left other ordering options in the gallery (other than the glossy metal) in case you just want a print of the image and don’t want to do the mirror. You can get it on canvas, polished 99.9% optically pure acrylic, and simple high-quality paper (“Roll Prints”). Take your time clicking around. “High-Gloss White” (on metal prints) refers to the base layer: if they print directly on the metal, the colors can be pretty muted. The white underlayment makes them pop much better.
Note that it takes about two weeks to print the HD Metal versions. It’s better that they take their time to get to perfection rather than rush, and indeed I saw no flaws whatever on either of mine.
The things you need if you want to do this:
- The photo! (via this page). By default, order pages show “Stretched Canvas”; I highly recommend that you click HD Metal (see the icons below the image), then choose “Sublimation Hi-Gloss White Metal Print with Back Frame” (which is the less expensive of the two options shown); I think a visible frame detracts from the impact. Acrylic would work great too if you like the more modern look. If adding the mirror, definitely go with at least 23 inches wide, or it will crowd the Pillars. If the glossy look is too much for you, switch to “Brushed Metal” (which happily is less expensive).
- A box of hexagonal mirror tiles, from Amazon * (or perhaps a hobby store near you).
- A tube of clear silicone sealant, which you can get at your local hardware store, Walmart/etc., or Amazon (such as this). I put a small pea-sized blob on the back of each mirror.
- And a steady hand (not supplied).
How I Did It
I had Kit take some photos when I made a second one, and by request I’ve expanded a bit on the steps (click photos to see larger):
 |
I put two pieces of 1-inch tape about 6 inches long on the corner of the print to provide a margin on the left and bottom. I then laid out the mirrors barely touching the tape, which helped to make sure they were perfectly straight. |
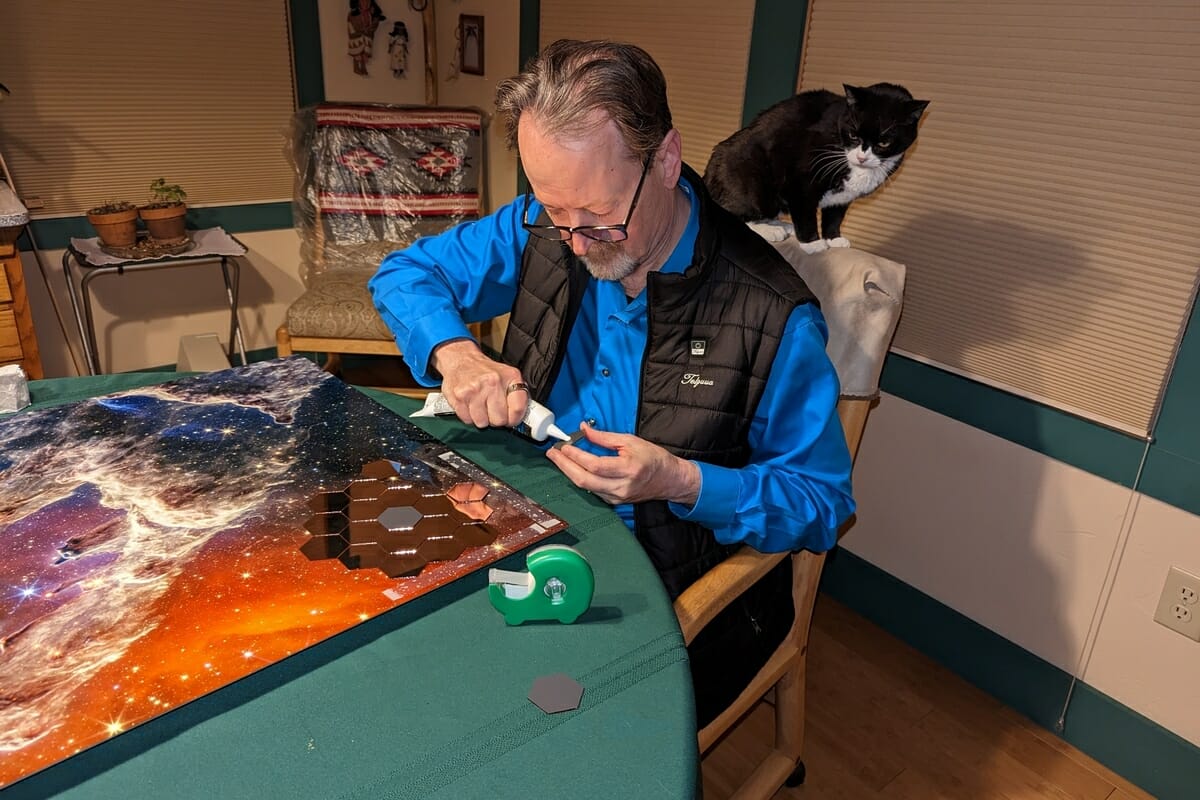 |
Once satisfied, and under the careful supervision of a tuxedo cat (optional), I picked up each mirror starting at the bottom, put a small blob of silicone on the back, and returned it to its spot, pressing down firmly and making sure it was straight. (If any silicone squeezes out the side, you used too much.) Then an adjacent mirror, being sure I put it up tight against the first one and aligned the corners well, and on and on for all 18 (plus one turned over in the center). |
 |
Silicone takes awhile to dry in an environment like this, so I took my time to ensure everything was straight. Use your fingers to slowly twist or slide any tiles that need to be better aligned, making sure there are no gaps or raised edges. Don’t worry about fingerprints: see below. (Supervisor is less concerned about this step.) |
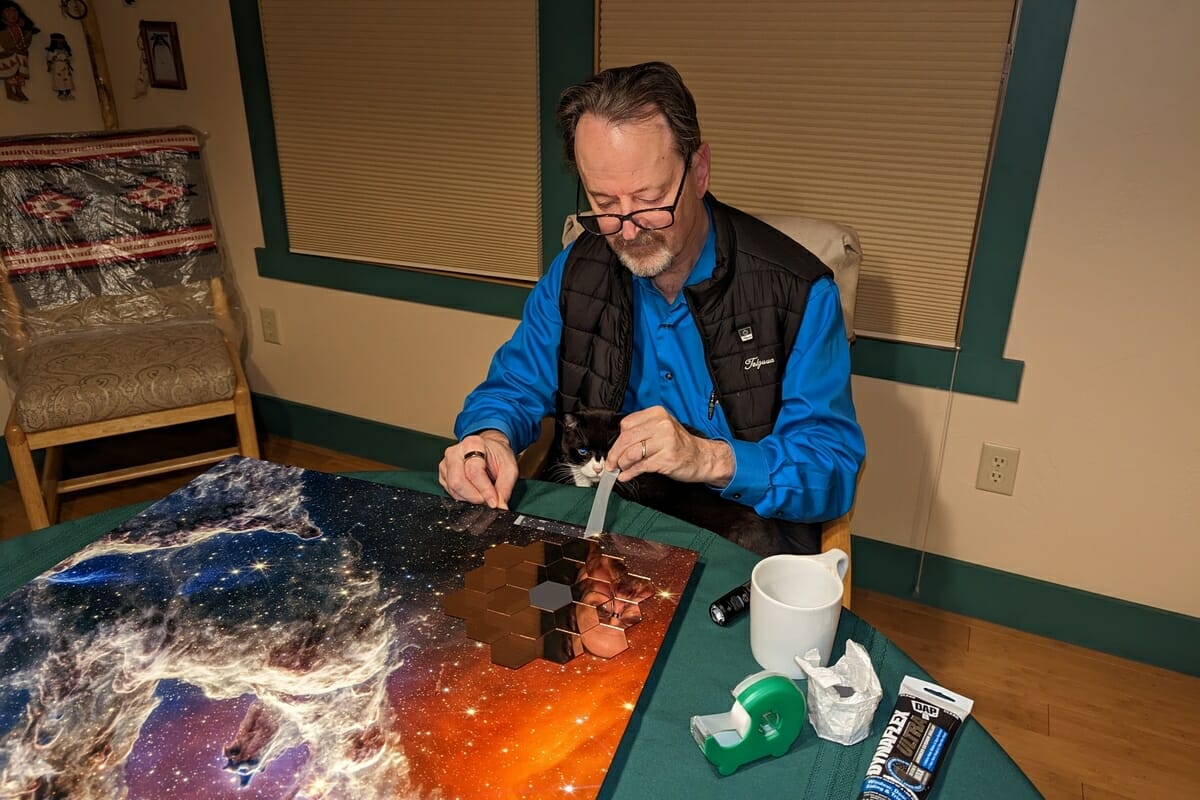 |
After making sure no mirror is over the tape, and you’re happy that everything is where you want it, carefully peel off the tape. (I folded each end into tabs to make that easy.) Supervisor cat should watch this step carefully. Then I recommend letting it sit flat at least overnight. |
 |
The next day, I dealt with the fingerprints on the mirrors. First, a “wet wipe” eyeglass cleaning pad is perfect to clean off the tiles, followed by a soft microfiber eyeglass cleaning cloth to buff each of the mirrors to a gleaming shine. Then it’s ready for your wall! |
Why the extra mirror to the side? I’m sticking it on the back “just in case” I need one later that exactly matches. A box of 50 mirrors is more than enough for two complete prints with several left over.
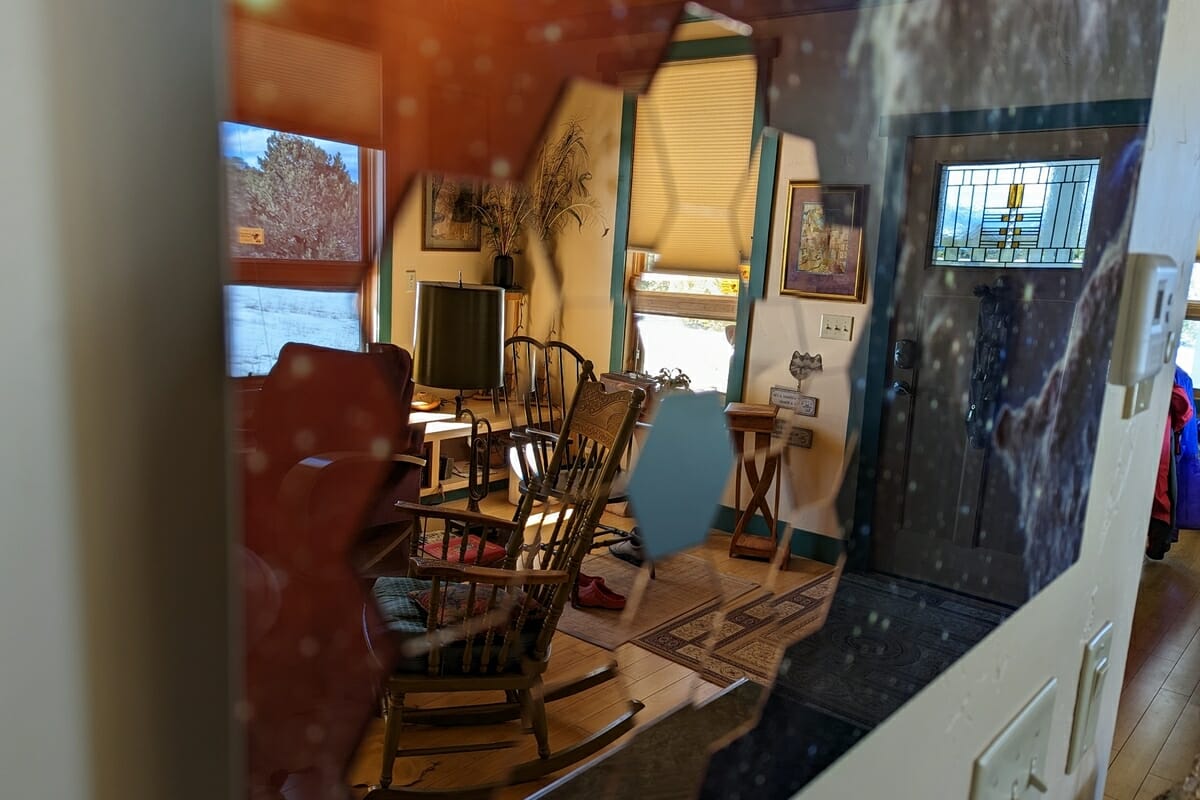
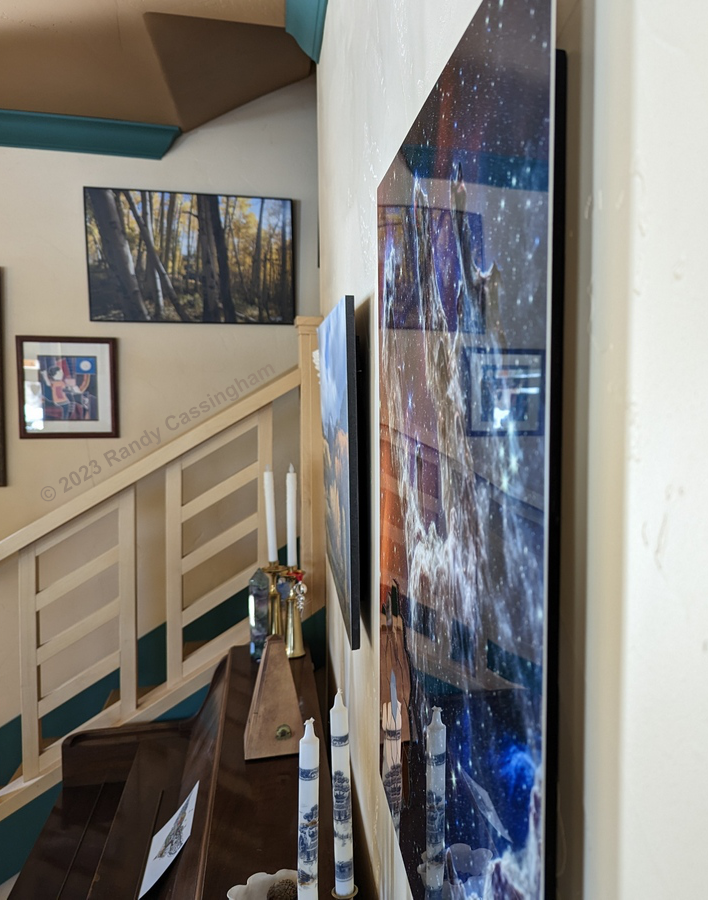
The “shadow” backing on the metal print works in any orientation (allowing for rotation), and snugs it up against the wall nicely, leaving a bit of a shadow around the edges.
After finding my spot, I tapped one nail into the wall, and then used a yardstick and a level (or you might just have a longish level) to put in a second perfectly level nail about 15 inches from the first, and then simply rested the “back frame” on the nails.
It was easy, and very reasonably priced for a piece of archival quality fine art of this size: less than $300 all in.
Kit wouldn’t let me put it in my office: she wanted it in the living room so guests could easily see it! And her too, really.
If you are a space geek, you just might want to do it too. Again, you can order the print here.
Previously I said the only thing I would do differently is go for the next largest size! That’s why I made a second one; a reader bought the first. I hope it ends up being extremely valuable.
Reader Gallery
Photos from readers who now have the idea on their own walls.

That wall is the first thing people face as they walk into the office and I get to look at it all day long as well (my desk is across the room from dad’s) so although its placement may seem odd, it’s actually perfect.
Thank you once again for sharing it with me!
You’re most welcome, Russell. It looks great! -rc
If you’ve made one, I’d love to see it. Send me a photo and any story that’s behind it. Thanks!
– – –
Bad link? Broken image? Other problem on this page? Let Me Know, and thanks.
This page is an example of my style of “Thought-Provoking Entertainment”. This is True is an email newsletter that uses “weird news” as a vehicle to explore the human condition in an entertaining way. If that sounds good, click here to open a subscribe form.
To really support This is True, you’re invited to sign up for a subscription to the much-expanded Premium edition.
Beautiful! I like how the Webb view looks like the Hubble one but after a snowstorm.
I never would have thought of this, but it turned out fantastically.
—
Thanks! -rc
Thanks for the step-by-step. I’m strongly considering making one for me… and maybe a family member (depending on the final price).
—
My pleasure. -rc
I got one for each of us. My stepdad loved it. He’s had an absolutely awful couple of years health-wise (thanks to the long-term effects from radiation treatment for cancer years ago). To see a smile on his face was a rare and precious thing.
—
Very cool! I’d love a photo (or two!) of it/them on the wall. -rc
It looks like “the hand of God.”
The image is like something you’d expect to see on the cover of a 1950’s SF paperback by, I dunno, Clarke, Heinlein, Asimov, or a short story anthology maybe. Brings back my youf! (I’m not that old, but my dad and his friends had loads of those books on their shelves).
—
That’s only because they were terrific. 🙂 -rc
The “Pillars of Creation” has always been my favorite from Hubble as well as the JWST. Once I am back to work, I will have to see what I can do to get one of those prints. It looks amazing!! Thank you for sharing!
—
You’re most welcome. -rc
What a neat idea and what a fun art project! Placing those first three tiles (on the lower left) was the most nerve-wracking, but all the others just kinda slid into place since they had a “cradle” of sorts.
It looks great on my wall, thank you!
—
Awesome. If you would, email me a photo of it on your wall. Since I just did a second one, I had Kit take photos of me doing the mirrors so I can detail that process to make it easier for others. -rc
That is incredible!
The first idea that came to my mind was to overlay the mirrors on top of the print. It would only work if the glass was tinted and not part of the backing. (Some mirrors use this trick as they are cheaper and easier to manufacture.)
The hard parts are next! First would be to remove the backing from the mirrors with acetone or something similar. Then finding a solution to affix them to the metal print. Two thoughts come to mind. Fist would be Scotch “AGT” tape, a double sided tape for holding a matt and print together. The other would be a thin layer of resin that would produce the best results but hardest to achieve.
—
Which is why I use plain mirrors with no adhesive, but use an opaque backing. With built-in adhesive, you’d have to lay the mirror down perfectly the first try, since there would be no nudging it into place. With silicone, it takes hours to really set, so plenty of time to make sure everything looks right. -rc
I’m an engineer. I see the JWST results and I think of the engineering that went into the design, implementation, launch and placement. I have two emotions: I REALLY am jealous of the folks who got to work on all aspects from initial concept to first light. What a cool project! The other emotion is gratefulness that our tax dollars go to create such a marvelous tool. Bravo Zulu!
The JWST has found roughly double the number of galaxies we know of. Wikipedia says “It is estimated that there are roughly 200 billion galaxies (2×10¹¹) in the observable universe.[8] Most galaxies are 1,000 to 100,000 parsecs in diameter (approximately 3,000 to 300,000 light years) and are separated by distances on the order of millions of parsecs (or megaparsecs).”
Each galaxy has about 100 MILLION stars.
As a Christian, I am blown away at the enormous creations of God. Very humbling. As a science fiction reader, I want humans to actually go out and actively explore them.
WELL DONE, NASA!! What is next on the list?
—
100 million stars is an approximate average of observed galaxies. Supergiant galaxies have been found to have as many as 100 TRILLION stars. Mind-boggling. And we’re only beginning to scratch the surface, thanks to Hubble and Webb. -rc